Syncing Your Outlook Calendar with Apple Calendar: A Comprehensive Guide
Related Articles: Syncing Your Outlook Calendar with Apple Calendar: A Comprehensive Guide
Introduction
With enthusiasm, let’s navigate through the intriguing topic related to Syncing Your Outlook Calendar with Apple Calendar: A Comprehensive Guide. Let’s weave interesting information and offer fresh perspectives to the readers.
Table of Content
Syncing Your Outlook Calendar with Apple Calendar: A Comprehensive Guide
![How to Sync Outlook Calendar with iPhone [3 Easy Ways 2024]](https://10scopes.com/wp-content/uploads/2022/08/how-to-sync-outlook-calendar-with-iPhone.jpg)
Maintaining a consistent schedule across multiple devices and platforms is crucial for productivity. For many users, this means juggling Microsoft Outlook and Apple Calendar. While these calendars operate on different ecosystems, seamless synchronization is achievable, ensuring you never miss an appointment or event regardless of whether you’re using a Windows PC, a Mac, or an iOS device. This article provides a comprehensive guide to syncing your Outlook calendar with Apple Calendar, covering various methods and troubleshooting common issues.
Understanding the Synchronization Methods:
Before diving into the specifics, it’s important to understand the core methods available for synchronizing your Outlook and Apple calendars. The best method depends on your specific needs and technical comfort level. Generally, the methods can be categorized as:
-
Using a Third-Party App: This involves utilizing a dedicated application designed to bridge the gap between Outlook and Apple’s ecosystem. These apps often offer additional features beyond basic synchronization.
-
Using iCloud for Windows: Microsoft provides iCloud for Windows, which facilitates synchronization between various Apple services and Windows. This is a relatively straightforward method for those already using iCloud.
-
Exporting and Importing (Manual Synchronization): This involves exporting your Outlook calendar data into a compatible format (like .ics) and then importing it into Apple Calendar. While less automated, this method offers control and is useful for one-time transfers or specific calendar selections.
-
Exchange Server and CalDAV: If your Outlook calendar is hosted on an Exchange server that supports CalDAV, you can directly configure Apple Calendar to connect to it. This is a robust method for organizations using Exchange.
Method 1: Utilizing a Third-Party App
Several third-party applications specialize in calendar synchronization across different platforms. These apps often provide features like two-way synchronization (changes made on either calendar are reflected on the other), conflict resolution, and advanced filtering options. Popular choices include:
-
Fantastical: Known for its intuitive interface and powerful features, Fantastical is a premium calendar app available for Mac, iOS, and iPadOS. It can connect to various calendar services, including Outlook.
-
BusyCal: Another premium calendar app with robust features, including natural language processing for event creation and powerful visualization options. It also offers seamless integration with Outlook.
-
Outlook (with a Microsoft 365 subscription): If you are a Microsoft 365 subscriber, the Outlook app itself often has built-in functionality to connect to other calendars, including those on iCloud. Check your Outlook settings for options to add an iCloud account.
Steps using a third-party app (example using Fantastical):
-
Install the App: Download and install the chosen third-party app on your devices (Mac, iOS, etc.).
-
Add Outlook Account: Within the app’s settings, look for options to add a new calendar account. You’ll likely need to provide your Outlook email address and password. Some apps may require authorization through OAuth for secure connection.
-
Select Outlook Calendar: Once your Outlook account is added, you might need to specifically select the calendar(s) you want to sync. Most apps allow you to choose individual calendars or sync all of them.
-
Configure Synchronization Settings: Review the app’s synchronization settings. You can often customize how frequently the calendars are synced, whether it’s two-way or one-way, and other preferences.
Method 2: Using iCloud for Windows
iCloud for Windows is a free application from Apple that allows you to sync your Apple data, including your calendar, with your Windows PC. This is a straightforward approach if you already use iCloud.
Steps using iCloud for Windows:
-
Download and Install iCloud for Windows: Download the application from Apple’s website and install it on your Windows PC.
-
Sign in with Apple ID: Sign in using your Apple ID and password.
-
Enable Calendar Sync: During the setup process, or within iCloud for Windows’ settings afterward, ensure that the "Calendar" option is enabled for synchronization.
-
Configure Outlook: While iCloud for Windows doesn’t directly integrate with Outlook, it creates an iCloud calendar on your Windows system. You can then add this iCloud calendar to Outlook as a shared calendar. This involves adding a new calendar in Outlook and entering the appropriate iCloud calendar information. The exact steps may vary slightly depending on your Outlook version.
Method 3: Exporting and Importing (Manual Synchronization)
This method involves manually exporting your Outlook calendar data and importing it into Apple Calendar. It’s less automated but offers granular control.
Steps for Exporting and Importing:
-
Export from Outlook: In Outlook, open the calendar you want to export. Go to "File" > "Open & Export" > "Import/Export". Choose "Export to a file" and select "iCalendar (.ics)". Select the calendar to export and choose a location to save the .ics file.
-
Import into Apple Calendar: On your Mac or iOS device, open Calendar. Go to "File" > "Import". Select the .ics file you exported from Outlook. Apple Calendar will import the events into your main calendar or a new calendar, depending on your settings.
Method 4: Exchange Server and CalDAV
If your Outlook calendar is hosted on an Exchange server that supports CalDAV, you can directly connect Apple Calendar to it. This provides a seamless, two-way synchronization.
Steps using Exchange Server and CalDAV (requires server configuration):
-
Check for CalDAV Support: Confirm with your Exchange server administrator whether your server supports CalDAV.
-
Obtain Server Details: You’ll need the server address, username, and password to configure the connection.
-
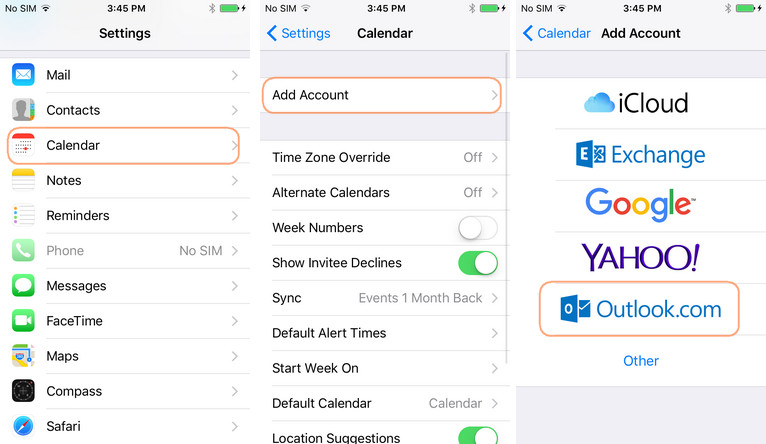
Add Account in Apple Calendar: In Apple Calendar, go to "Preferences" (or "Settings" on iOS) and click "Accounts". Click the "+" button to add a new account. Choose "Other Calendar Account" and select "CalDAV". Enter the server details obtained in step 2.
Troubleshooting Common Issues:
-
Synchronization Errors: Check your internet connection and ensure that your Outlook and Apple accounts have the correct login credentials. Restart your devices and the relevant applications.
-
One-Way Synchronization: Ensure that your chosen method supports two-way synchronization. If not, you’ll need to manually update the calendar on one platform after making changes on the other.
-
Calendar Conflicts: If you have conflicting events, you may need to manually resolve them. Some third-party apps offer conflict resolution features.
-
Data Loss: Regularly back up your calendar data to prevent data loss. This is especially important when using manual synchronization methods.
Conclusion:
Syncing your Outlook calendar with Apple Calendar doesn’t have to be a complex task. By choosing the appropriate method based on your needs and technical expertise, you can maintain a consistent and up-to-date schedule across all your devices. Remember to carefully follow the steps for your chosen method and troubleshoot any issues that may arise. With a little planning and attention to detail, you can enjoy seamless calendar synchronization between Outlook and Apple Calendar, enhancing your productivity and organization.


![[SOLVED] How to sync Outlook calendar with iPhone?](https://www.copytrans.net/app/uploads/sites/2/2013/12/ctc-synced-outlook-calendar-800x625.png)

Closure
Thus, we hope this article has provided valuable insights into Syncing Your Outlook Calendar with Apple Calendar: A Comprehensive Guide. We appreciate your attention to our article. See you in our next article!