Connecting Your Google Calendar to Your iPhone: A Comprehensive Guide
Related Articles: Connecting Your Google Calendar to Your iPhone: A Comprehensive Guide
Introduction
With enthusiasm, let’s navigate through the intriguing topic related to Connecting Your Google Calendar to Your iPhone: A Comprehensive Guide. Let’s weave interesting information and offer fresh perspectives to the readers.
Table of Content
Connecting Your Google Calendar to Your iPhone: A Comprehensive Guide
Staying organized in today’s fast-paced world requires seamless integration between your devices and applications. For many, this means linking their Google Calendar, a powerful and versatile scheduling tool, with their iPhone, a ubiquitous mobile companion. This comprehensive guide will walk you through every step of the process, covering various scenarios and troubleshooting common issues. We’ll explore multiple methods, ensuring you find the approach that best suits your needs and technical proficiency.
Understanding the Integration:
Before diving into the specifics, it’s crucial to understand how Google Calendar integrates with your iPhone. The core functionality relies on syncing: changes you make on your Google Calendar (adding events, modifying times, deleting entries) will be reflected on your iPhone calendar, and vice versa. This bidirectional sync ensures your schedule remains consistent across all your devices. The connection is facilitated by your Google account credentials and the native Calendar app on your iPhone.
Method 1: The Standard Approach (Using the Built-in Calendar App)
This is the simplest and most recommended method for linking your Google Calendar to your iPhone. It leverages Apple’s built-in Calendar app and requires minimal technical knowledge.
Step 1: Ensure Your Google Account is Set Up on Your iPhone:
Before you can connect your calendar, your Google account needs to be configured on your iPhone. This is typically done during initial device setup, but you can add it later:
- Go to Settings: Open the Settings app on your iPhone.
- Tap Passwords & Accounts: Locate and tap this option.
- Tap Add Account: Select this to add a new account.
- Choose Google: From the list of available account types, select Google.
- Enter Your Google Credentials: Enter your Google email address and password.
- Grant Permissions: Google will request permission to access various aspects of your account, including your calendar. Allow these permissions for the integration to work correctly.
Step 2: Adding Your Google Calendar to the iPhone Calendar App:
Once your Google account is added, the next step is to link the calendar itself:
- Open the Calendar App: Launch the default Calendar app on your iPhone.
- Go to Accounts: Navigate to the "Accounts" section (usually found in the Settings within the Calendar app, or through a dedicated "Accounts" tab). The exact location might vary slightly depending on your iOS version.
- Select Your Google Account: Choose the Google account you added in the previous step.
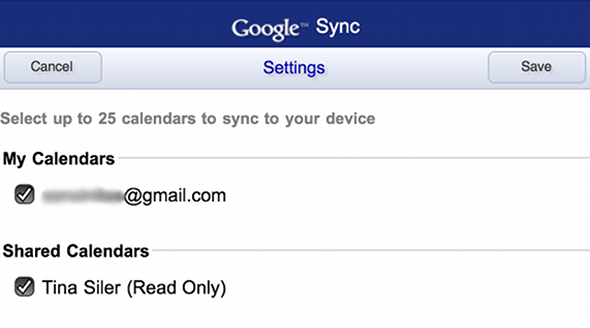
- Enable Calendars: You’ll see a list of your Google calendars. Toggle the switch next to each calendar you wish to sync to your iPhone. This allows you to selectively choose which calendars appear on your iPhone.
Step 3: Verify the Sync:
After enabling the calendars, give it a few minutes for the synchronization to complete. Check your iPhone’s Calendar app to confirm that events from your Google Calendar are appearing. Adding a new event on your Google Calendar and checking if it appears on your iPhone is a good way to test the connection.
Method 2: Using a Third-Party Calendar App
While the built-in method is generally sufficient, some users prefer using third-party calendar apps like Fantastical, Outlook, or Calendars 5. These apps often offer enhanced features like natural language processing for event creation and more customizable views. The process will vary slightly depending on the chosen app:
- Download and Install the App: Download your preferred third-party calendar app from the App Store.
- Add Your Google Account: The app will guide you through adding your Google account. This process is similar to adding an account in the native Calendar app, requiring your Google email and password.
- Select Calendars to Sync: Similar to the built-in method, you can choose which Google calendars to sync with the third-party app.
- Configure Settings: Explore the app’s settings to customize its appearance, notifications, and other features.
Troubleshooting Common Issues:
Despite the straightforwardness of the process, you might encounter some problems. Here are some common issues and their solutions:
-
Calendar Not Syncing: This is often due to network connectivity issues. Ensure your iPhone has a stable internet connection (Wi-Fi or cellular data). Also, check your Google account settings to ensure that sync is enabled. Restarting both your iPhone and your router can sometimes resolve temporary glitches.
-
Incorrect Credentials: Double-check that you’re entering the correct Google email address and password. Incorrect credentials will prevent the connection from being established.
-
Two-Factor Authentication: If you have two-factor authentication enabled on your Google account, you might need to generate an app password. Google provides instructions on how to create these passwords specifically for app integrations.
-
Calendar App Issues: If the problem persists, try restarting your iPhone or reinstalling the Calendar app (for the built-in app, this is generally not recommended unless other issues are present).
-
iOS Updates: Ensure your iPhone’s iOS is up-to-date. Outdated software can sometimes cause compatibility issues.
-
Google Calendar Issues: Rarely, the problem might originate from Google’s servers. Check Google’s status page to see if there are any reported outages affecting Google Calendar.
Advanced Tips and Considerations:
-
Selective Syncing: Don’t feel obligated to sync every single Google Calendar. Choose only the calendars you frequently need access to on your iPhone to avoid cluttering your schedule.
-
Notification Settings: Customize notification settings within both the Google Calendar and the iPhone Calendar app to receive alerts for specific events or calendars.
-
Calendar Colors: Assign different colors to your calendars for better visual organization and easy identification of events.
-
Offline Access: While not all features might be available offline, some calendar apps offer the ability to access your schedule even without an internet connection. Check your app’s settings for this option.
Conclusion:
Linking your Google Calendar to your iPhone is a simple yet powerful way to enhance your productivity and organization. By following the steps outlined in this guide and understanding the troubleshooting techniques, you can seamlessly integrate your Google Calendar into your iPhone’s ecosystem, ensuring you always have your schedule at your fingertips. Remember to choose the method that best suits your comfort level and technical expertise, and don’t hesitate to explore the advanced features offered by both Google Calendar and your chosen calendar app on your iPhone. With a little setup, you’ll enjoy the convenience of a unified and synchronized calendar experience.

:max_bytes(150000):strip_icc()/001-sync-google-calendar-with-iphone-calendar-1172187-fc76a6381a204ebe8b88f5f3f9af4eb5.jpg)

Closure
Thus, we hope this article has provided valuable insights into Connecting Your Google Calendar to Your iPhone: A Comprehensive Guide. We hope you find this article informative and beneficial. See you in our next article!