Banishing Holiday Blues: A Comprehensive Guide to Removing Holidays from Your Outlook Calendar
Related Articles: Banishing Holiday Blues: A Comprehensive Guide to Removing Holidays from Your Outlook Calendar
Introduction
With enthusiasm, let’s navigate through the intriguing topic related to Banishing Holiday Blues: A Comprehensive Guide to Removing Holidays from Your Outlook Calendar. Let’s weave interesting information and offer fresh perspectives to the readers.
Table of Content
Banishing Holiday Blues: A Comprehensive Guide to Removing Holidays from Your Outlook Calendar

The Outlook calendar is a powerful tool for managing your schedule, but its pre-loaded holidays can sometimes become more of a hindrance than a help. Whether you find them distracting, irrelevant to your region, or simply prefer a clean, uncluttered view, removing these holiday entries can significantly improve your calendar experience. This comprehensive guide will walk you through various methods for removing holidays from your Outlook calendar, catering to different versions and scenarios. We’ll explore both quick fixes and more in-depth solutions, ensuring you achieve the desired level of calendar customization.
Understanding Outlook’s Holiday Integration:
Before diving into removal methods, it’s crucial to understand how Outlook integrates holidays. Microsoft Outlook automatically downloads holiday data based on your region settings. This ensures that the calendar accurately reflects the public holidays relevant to your location. However, these settings can sometimes be inaccurate or include holidays you don’t need. The process of removing these holidays depends on how they were added and the version of Outlook you’re using.
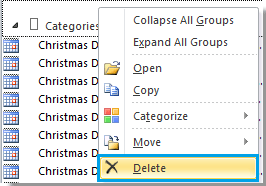
Method 1: The Simple Delete (For Individual Holidays):
This is the most straightforward method, ideal for removing a single holiday or a few unwanted entries. Simply locate the holiday entry on your calendar, select it, and press the "Delete" key. This method works across all versions of Outlook. However, it’s not practical if you want to remove all holidays or if the holidays reappear after a calendar refresh.
Method 2: Disabling Holiday Calendars (Outlook 2016 and Later):
This method offers a more permanent solution, preventing future holiday additions. It’s particularly useful if you’re consistently bothered by unwanted holiday entries.
-
Locate the Holiday Calendar: Open your Outlook calendar. You’ll likely see multiple calendars listed in the navigation pane on the left. Look for a calendar titled "Holidays" or something similar, often with a country or region designation (e.g., "Holidays (United States)").
-
Disable the Calendar: Right-click on the holiday calendar you want to remove. Select "Unsubscribe" or "Disable" from the context menu. This will remove the holiday entries from your main calendar view. The calendar will remain in your calendar list, but it will be inactive and won’t display holidays.
-
Re-enabling (Optional): If you later decide you want the holidays back, simply right-click on the holiday calendar and select "Subscribe" or "Enable."
Method 3: Modifying Regional Settings (Outlook 2016 and Later):
This method tackles the root cause by changing the region associated with your calendar’s holiday data. This is effective if the default holiday data is incorrect or irrelevant.
-
Access Regional Settings: Open Outlook and go to "File" > "Options" > "Calendar."
-
Locate Time Zone and Regional Settings: Within the Calendar Options, look for settings related to time zones and regions. The exact wording may vary depending on your Outlook version.
-
Change Regional Settings: Modify the region to reflect your desired location. This will likely trigger a calendar update, downloading holiday data relevant to the new region. After the update, you can then use Method 2 to disable the unwanted holiday calendar.
Method 4: Creating a Custom Calendar (For Advanced Users):
For users seeking maximum control, creating a custom calendar offers a sophisticated approach. This method allows you to build a calendar from scratch, excluding holidays entirely.
-
Create a New Calendar: In Outlook, go to "File" > "New" > "Calendar." Give your new calendar a descriptive name (e.g., "My Work Calendar").
-
Import Existing Events (Optional): You can selectively copy events from your main calendar to your new custom calendar, avoiding the holiday entries.
-
Manage Events Manually: This method requires you to manually add all events, including holidays if you desire them, giving you complete control over what appears on your calendar.
Method 5: Using Outlook’s Filtering Capabilities (For Selective Removal):
If you want to retain some holidays but remove others, Outlook’s filtering capabilities can be invaluable. This method is more complex but offers granular control.
-
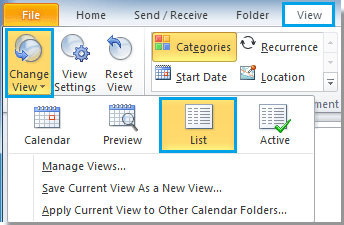
Create a Filter View: In your calendar, go to "View" > "Change View" > "Manage Views." Click "New" to create a custom view.
-
Define Filter Criteria: In the filter settings, specify criteria to exclude unwanted holidays. You can filter by subject, keywords, or even specific dates. For instance, you could filter out all entries containing "Holiday" in the subject line.
-
Save the Filter View: Save your custom view to easily access it whenever you need a holiday-free calendar perspective.
Method 6: Third-Party Add-ins (For Specialized Needs):
Several third-party add-ins enhance Outlook’s calendar functionality. Some might offer features to customize or remove holidays more effectively than the built-in methods. Research reputable add-ins that align with your needs before installing them. Always exercise caution when downloading and installing third-party software.
Troubleshooting Common Issues:
-
Holidays Reappear: If holidays reappear after removal, ensure you’ve disabled the holiday calendar (Method 2) or checked your regional settings (Method 3) to prevent automatic updates.
-
Calendar Synchronization Issues: If using multiple devices or Outlook accounts, ensure your calendar settings are synchronized across all platforms to maintain consistency.
-
Incorrect Regional Settings: Verify that your regional settings accurately reflect your location. Incorrect settings can lead to the wrong holiday data being downloaded.
Conclusion:
Removing holidays from your Outlook calendar is achievable through several methods, ranging from simple deletion to advanced customization. Choosing the right approach depends on your specific needs and technical proficiency. By mastering these techniques, you can transform your Outlook calendar into a more efficient and personalized tool, free from the distractions of irrelevant holiday entries. Remember to back up your calendar data before making significant changes, ensuring you can revert to a previous state if needed. With a little patience and the right method, you can say goodbye to unwanted holiday clutter and hello to a cleaner, more focused calendar experience.


Closure
Thus, we hope this article has provided valuable insights into Banishing Holiday Blues: A Comprehensive Guide to Removing Holidays from Your Outlook Calendar. We hope you find this article informative and beneficial. See you in our next article!